主从复制和读写分离
案例概述
在生产环境中,如果对数据库的读和写都在同一个数据库服务器中操作,无论是在高可用、高并发、安全性等方面都是不能满足实际需求的。因此,需要通过主从复制(Master-Slave)来同步数据,再通过读写分离来提升数据库并发负载能力的方案来进行部署与实施。
案例场景
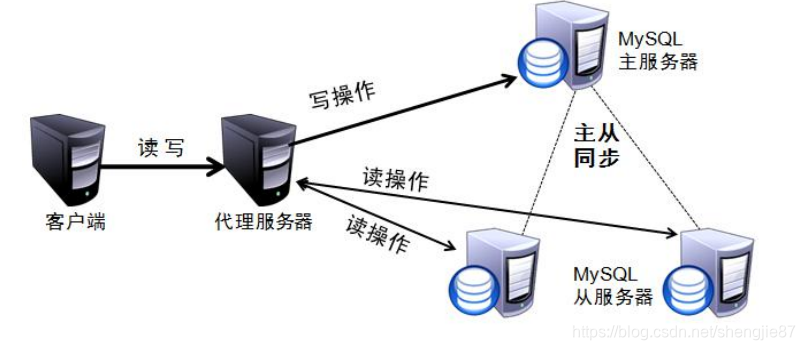
一台主 MySQL 服务器带两台从 MySQL 服务器做数据复制,客户端在进行数据库写操作时,对主服务器进行操作,在进行数据库读操作时,对两台从服务器进行操作,这样操作就大量减轻了对主 MySQL 服务器的压力。
MySQL 的主从复制和 MySQL 的读写分离两者有着紧密联系,首先要部署主从复制, 只有主从复制完成了,才能在此基础上进行数据的读写分离!
主从复制
1、复制类型
基于语句的复制:在主服务器上执行的 SQL 语句,在从服务器上执行同样的语句。 MySQL 默认采用基于语句的复制,效率比较高。
基于行的复制:把改变的内容复制过去,而不是把命令在从服务器上执行一遍。
混合类型的复制:默认采用基于语句的复制,一旦发现基于语句无法精确复制时,就会采用基于行的复制。
2、工作流程
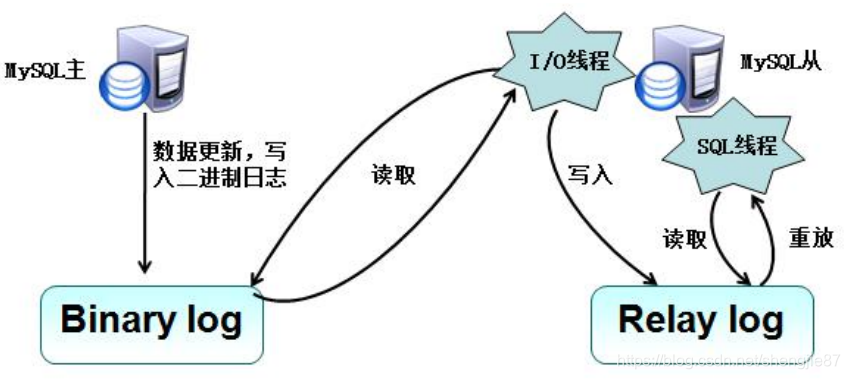
- 在每个事务更新数据完成之前,Master 将这些改变记录写入二进制日志。写入二进制日志完成后,Master 通知存储引擎提交事务。
- Slave 将 Master 的 Binary log 复制到其中继日志(Relay log)。首先,Slave 开始一个工作线程(I/O 线程),I/O 线程在 Master 上打开一个普通的连接,然后开始 Binlog dump process。Binlog dump process 从 Master 的二进制日志中读取事件,如果已经跟上Master,它会睡眠并等待 Master 产生新的事件。I/O 线程将这些事件写入中继日志。
- SQL slave thread(SQL 从线程)处理该过程的最后一步。SQL 线程从中继日志读取事件,并重放其中的事件而更新 Slave 数据,使其与 Master 中的数据保持一致。中继日志通常会位于 OS 的缓存中,开销很小。
读写分离
1、原理
简单来说,读写分离就是只在主服务器上写,只在从服务器上读。基本的原理是让主数据库处理事务性查询,而从数据库处理 select 查询。数据库复制被用来把主数据库上事务性查询导致的变更同步到集群中的从数据库。
2、实现方式
基于程序代码内部实现:在代码中根据 select、insert 进行路由分类,这类方法也是目前生产环境应用最广泛的。优点是性能较好,因为在程序代码中实现,不需要增加额外的设备作为硬件开支;缺点是需要开发人员来实现,运维人员无从下手。
基于中间代理层实现:代理一般位于客户端和服务器之间,代理服务器接到客户端请求后通过判断后转发到后端数据库,有以下两个代表性程序:
- MySQL-Proxy:MySQL-Proxy 为 MySQL 开源项目,通过其自带的 lua 脚本进行 SQL 判断,虽然是 MySQL 官方产品,但是 MySQL 官方并不建议将 MySQL-Proxy 用到生产环境。
- Amoeba:由陈思儒开发,作者曾就职于阿里巴巴。该程序由 Java 语言进行开发, 阿里巴巴将其用于生产环境。它不支持事务和存储过程。
部署环境
1
2
3
4
5
| client:192.168.179.128
master:192.168.179.129
slave1:192.168.179.130
slave2:192.168.179.131
amoeba:192.168.179.132
|
Linux Mysql 安装配置
tar.gz 包安装
1、检查是否已经安装 mysql 或 mariadb
1
2
3
4
5
6
7
8
9
10
| rpm -qa mysql
或
rpm -qa | grep mysql
##### ##### ##### ##### ##### #####
rpm -qa mariadb
或
rpm -qa | grep mariadb
##### ##### ##### ##### ##### #####
# 卸载
rpm -e --nodeps 【软件包名称】
|
2、下载官方 Mysql 包
1
2
3
4
| # 查看系统位数
uname -m
yum install -y wget
wget -P /usr/local https://downloads.mysql.com/archives/get/p/23/file/mysql-5.7.44-linux-glibc2.12-x86_64.tar.gz
|
3、解压
1
2
| tar -zxvf /usr/local/mysql-5.7.44-linux-glibc2.12-x86_64.tar.gz -C /usr/local
mv /usr/local/mysql-5.7.44-linux-glibc2.12-x86_64 /usr/local/mysql
|
4、创建用户
1
2
3
4
5
6
7
8
9
| groupadd mysql
# -r 表示 mysql 用户是系统用户,不可用于登录系统
# -g 表示将 mysql 用户添加到 mysql 用户组中
useradd -r -g mysql mysql
passwd mysql
yueyazhui
# 更改目录及其内容的所有者和用户组:chown -R username:groupname directory
chown -R mysql:mysql /usr/local/mysql
|
5、创建数据目录并赋予权限
1
2
| mkdir -p /data/mysql
chown -R mysql:mysql /data/mysql
|
6、修改配置文件
1
2
3
| yum install -y vim
cp /etc/my.cnf /etc/my.cnf.bak
vim /etc/my.cnf
|
1
2
3
4
5
6
7
8
9
10
11
12
13
14
15
16
17
18
19
20
21
22
23
24
25
26
27
28
29
30
31
32
33
34
35
| [mysqld]
# 绑定地址,允许外部连接
bind-address=0.0.0.0
# 端口
port=3306
# 用户
user=mysql
# 安装目录
basedir=/usr/local/mysql
# 数据的存放目录
datadir=/data/mysql
# 以 socket 方式运行时,sock 文件位置
socket=/tmp/mysql.sock
# 是否支持符号链接,即数据库或表可以存储在 my.cnf 中指定 datadir 之外的分区或者目录,为 0 不开启
symbolic-links=0
# 允许最大连接数
max_connections=200
# 允许连接失败的次数
max_connect_errors=10
# 字符集
character-set-server=utf8mb4
# 存储引擎
default-storage-engine=INNODB
# 插件认证方式
default_authentication_plugin=mysql_native_password
# SQL 模式
sql-mode=STRICT_TRANS_TABLES,NO_ZERO_IN_DATE,NO_ZERO_DATE,ERROR_FOR_DIVISION_BY_ZERO,NO_AUTO_CREATE_USER,NO_ENGINE_SUBSTITUTION
[mysqld_safe]
# 错误日志的存储位置
log-error=/data/mysql/mysql.err
# 存储MySQL服务进程ID的文件路径
pid-file=/data/mysql/mysql.pid
!includedir /etc/my.cnf.d
|
7、初始化数据库
1
2
| # 参数:--basedir 安装目录,–datadir 数据存放目录
/usr/local/mysql/bin/mysqld --defaults-file=/etc/my.cnf --basedir=/usr/local/mysql/ --datadir=/data/mysql/ --user=mysql --initialize
|
8、记录初始密码
1
2
3
4
5
6
7
8
9
10
| [root@yueyazhui1 ~]# /usr/local/mysql/bin/mysqld --defaults-file=/etc/my.cnf --basedir=/usr/local/mysql/ --datadir=/data/mysql/ --user=mysql --initialize
2024-08-21T07:00:29.621771Z 0 [Warning] TIMESTAMP with implicit DEFAULT value is deprecated. Please use --explicit_defaults_for_timestamp server option (see documentation for more details).
2024-08-21T07:00:30.303138Z 0 [Warning] InnoDB: New log files created, LSN=45790
2024-08-21T07:00:30.400308Z 0 [Warning] InnoDB: Creating foreign key constraint system tables.
2024-08-21T07:00:30.474363Z 0 [Warning] No existing UUID has been found, so we assume that this is the first time that this server has been started. Generating a new UUID: 0d951a8b-5f8b-11ef-8dd7-000c29ac1fce.
2024-08-21T07:00:30.476357Z 0 [Warning] Gtid table is not ready to be used. Table 'mysql.gtid_executed' cannot be opened.
2024-08-21T07:00:31.498509Z 0 [Warning] A deprecated TLS version TLSv1 is enabled. Please use TLSv1.2 or higher.
2024-08-21T07:00:31.498526Z 0 [Warning] A deprecated TLS version TLSv1.1 is enabled. Please use TLSv1.2 or higher.
2024-08-21T07:00:31.503953Z 0 [Warning] CA certificate ca.pem is self signed.
2024-08-21T07:00:31.831487Z 1 [Note] A temporary password is generated for root@localhost: fxR*gwf*a9SR
|
9、加入到系统服务并启动
1
2
3
4
5
6
| cp /usr/local/mysql/support-files/mysql.server /etc/init.d/mysql
service mysql start
# 开机自启
systemctl enable mysql
或
chkconfig mysql on
|
10、登录
1
| /usr/local/mysql/bin/mysql -u root -p
|
11、重置密码
1
2
3
| ALTER USER 'root'@'localhost' IDENTIFIED BY '123456';
FLUSH PRIVILEGES;
quit
|
12、重启服务
service mysql restart
2002-Can’t connect to server on’192.168.179.129’(10060)
1
2
3
4
| systemctl status firewalld
firewall-cmd --list-ports
firewall-cmd --zone=public --add-port=3306/tcp --permanent
firewall-cmd --reload
|
1130 - Host ‘192.168.179.1’is not allowed to connect to this MySQL server
1
| /usr/local/mysql/bin/mysql -u root -p
|
1
2
3
4
| use mysql
update user set host = '%' where user = 'root';
FLUSH PRIVILEGES;
quit
|
主从复制
配置 master
1、my.cnf 配置文件里插入以下内容,开启二进制日志并允许从服务器复制
1
2
3
| server-id = 129
log-bin=master-bin
log-slave-updates=true
|
2、登陆 mysql,给从服务器授权可以复制的权限
1
| /usr/local/mysql/bin/mysql -u root -p
|
1
2
| GRANT REPLICATION SLAVE ON *.* TO 'slave'@'192.168.179.%' IDENTIFIED BY '123456';
FLUSH PRIVILEGES;
|
3、查看主服务器的日志文件和状态点,之后会用到
1
2
3
4
5
6
7
| mysql> show master status;
+-------------------+----------+--------------+------------------+-------------------+
| File | Position | Binlog_Do_DB | Binlog_Ignore_DB | Executed_Gtid_Set |
+-------------------+----------+--------------+------------------+-------------------+
| master-bin.000002 | 594 | | | |
+-------------------+----------+--------------+------------------+-------------------+
1 row in set (0.00 sec)
|
配置两台 slave
1、my.cnf 配置文件里插入以下内容,开启二进制日志并允许从服务器复制
1
2
3
4
5
| server-id = 130
# 从主服务器上同步日志文件记录到本地
relay-log=relay-log-bin
# 定义 relay-log 的位置和名称
relay-log-index=slave-relay-bin.index
|
2、登陆 mysql,设置同步数据库的 IP地址、用户名、密码、日志文件和状态点
1
| /usr/local/mysql/bin/mysql -u root -p
|
1
2
3
4
5
6
7
8
9
10
11
12
13
14
15
16
17
18
19
| mysql> change master to master_host='192.168.179.129',master_user='slave',master_password='123456',master_log_file='master-bin.000002',master_log_pos=594;
mysql> start slave; --开启 slave
mysql> show slave status \G;
*************************** 1. row ***************************
Slave_IO_State: Waiting for master to send event
Master_Host: 192.168.179.129
Master_User: slave
Master_Port: 3306
Connect_Retry: 60
Master_Log_File: master-bin.000002
Read_Master_Log_Pos: 594
Relay_Log_File: relay-log-bin.000002
Relay_Log_Pos: 321
Relay_Master_Log_File: master-bin.000002
Slave_IO_Running: Yes -- 正常
Slave_SQL_Running: Yes -- 正常
:
|
注:如果 master 数据库的日志文件和状态点改变,执行以下操作
1
2
3
| mysql> stop slave; --开启 slave
mysql> change master to master_host='192.168.179.129',master_user='slave',master_password='123456',master_log_file='master-bin.000002',master_log_pos=594;
|
测试同步
1、master:新建数据库
1
| /usr/local/mysql/bin/mysql -u root -p
|
1
2
3
4
5
6
7
8
9
10
11
12
13
14
15
16
17
18
19
20
21
22
23
24
25
| mysql> show databases;
+--------------------+
| Database |
+--------------------+
| information_schema |
| mysql |
| performance_schema |
| sys |
+--------------------+
4 rows in set (0.00 sec)
mysql> create database test_master_slave_copy;
Query OK, 1 row affected (0.01 sec)
mysql> show databases;
+------------------------+
| Database |
+------------------------+
| information_schema |
| mysql |
| performance_schema |
| sys |
| test_master_slave_copy |
+------------------------+
5 rows in set (0.00 sec)
|
2、查看两台 slave 是否同步
1
| /usr/local/mysql/bin/mysql -u root -p
|
1
2
3
4
5
6
7
8
9
10
11
| mysql> show databases;
+------------------------+
| Database |
+------------------------+
| information_schema |
| mysql |
| performance_schema |
| sys |
| test_master_slave_copy |
+------------------------+
5 rows in set (0.01 sec)
|
读写分离
软件下载与安装
jdk-8u201-linux-x64.tar.gz
amoeba-mysql-3.0.5-RC-distribution.zip
1、将包上传到 amoeba 服务器的 /usr/local 文件夹下面
2、解压 JDK
1
| tar -zxvf /usr/local/jdk-8u201-linux-x64.tar.gz -C /usr/local/
|
3、配置 Java 环境变量
1
2
3
4
5
6
7
8
9
10
| vi /etc/profile
# Java 环境变量
JAVA_HOME=/usr/local/jdk1.8.0_201
PATH=$JAVA_HOME/bin:$PATH
CLASSPATH=.:$JAVA_HOME/lib/dt.jar:$JAVA_HOME/lib/tool.jar
export JAVA_HOME PATH CLASSPATH
source /etc/profile
java -version
|
4、解压 amoeba
1
2
| yum install -y zip unzip vim net-tools
unzip /usr/local/amoeba-mysql-3.0.5-RC-distribution.zip -d /usr/local/
|
5、启动 amoeba,默认端口:8066
1
| vi /usr/local/amoeba-mysql-3.0.5-RC/jvm.properties
|
1
2
3
| JVM_OPTIONS="-server -Xms256m -Xmx1024m -Xss196k -XX:PermSize=16m -XX:MaxPermSize=96m"
替换为:
JVM_OPTIONS="-server -Xms1024m -Xmx1024m -Xss256k -XX:PermSize=16m -XX:MaxPermSize=96m"
|
1
| /usr/local/amoeba-mysql-3.0.5-RC/bin/launcher
|
amoeba 配置
1、在三台主从服务器上添加用户授权
1
| /usr/local/mysql/bin/mysql -u root -p
|
1
2
| GRANT ALL ON *.* TO 'amoeba'@'192.168.179.%' IDENTIFIED BY '123456';
FLUSH PRIVILEGES;
|
2、修改配置
1
| vim /usr/local/amoeba-mysql-3.0.5-RC/conf/amoeba.xml
|
1
2
3
4
5
| 28 <property name="user">amoeba</property>
30 <property name="password">123456</property>
83 <property name="defaultPool">master</property>
86 <property name="writePool">master</property>
87 <property name="readPool">slaves</property>
|
1
| vim /usr/local/amoeba-mysql-3.0.5-RC/conf/dbServers.xml
|
1
2
3
4
5
6
7
8
9
10
11
12
13
14
15
16
17
18
19
20
21
22
23
24
25
26
27
28
29
30
31
32
33
34
| 23 <property name="schema">mysql</property>
26 <property name="user">amoeba</property>
28 <property name="password">123456</property>
43 <dbServer name="master" parent="abstractServer">
. <factoryConfig>
. <!-- mysql ip -->
. <property name="ipAddress">192.168.179.129</property>
. </factoryConfig>
. </dbServer>
.
. <dbServer name="slave1" parent="abstractServer">
. <factoryConfig>
. <!-- mysql ip -->
. <property name="ipAddress">192.168.179.130</property>
. </factoryConfig>
. </dbServer>
.
. <dbServer name="slave2" parent="abstractServer">
. <factoryConfig>
. <!-- mysql ip -->
. <property name="ipAddress">192.168.179.131</property>
. </factoryConfig>
. </dbServer>
.
. <dbServer name="slaves" virtual="true">
. <poolConfig class="com.meidusa.amoeba.server.MultipleServerPool">
. <!-- Load balancing strategy: 1=ROUNDROBIN , 2=WEIGHTBASED , 3=HA-->
. <property name="loadbalance">1</property>
.
. <!-- Separated by commas,such as: server1,server2,server1 -->
. <property name="poolNames">slave1,slave2</property>
. </poolConfig>
. </dbServer>
|
3、启动
1
2
3
4
5
6
7
| /usr/local/amoeba-mysql-3.0.5-RC/bin/shutdown
/usr/local/amoeba-mysql-3.0.5-RC/bin/launcher&
systemctl status firewalld
firewall-cmd --list-ports
firewall-cmd --zone=public --add-port=8066/tcp --permanent
firewall-cmd --reload
|
测试读写分离
1
2
3
4
5
6
7
8
9
10
11
12
13
14
15
16
17
18
19
20
21
22
23
| # 192.168.179.128 服务器
/usr/local/mysql/bin/mysql -h 192.168.179.132 -P 8066 -u amoeba -p
show databases;
use test_master_slave_copy;
create table info (id int(11) primary key, name varchar(20) not null, address varchar(50));
show tables;
# 192.168.179.130 从服务器、192.168.179.131 从服务器
/usr/local/mysql/bin/mysql -u root -p
stop slave;
# 192.168.179.128 服务器
use test_master_slave_copy;
insert into info values(1,'yueyazhui1','192.168.179.129');
# 192.168.179.130 从服务器
use test_master_slave_copy;
insert into info values(2,'yueyazhui2','192.168.179.130');
# 192.168.179.131 从服务器
use test_master_slave_copy;
insert into info values(3,'yueyazhui3','192.168.179.131');
# 192.168.179.128 服务器、192.168.179.129 主服务器
select * from info;
|
client 服务器会轮询显示 id = 2 或 id = 3 记录,但没有 id = 1 记录,证明写操作是 master 执行的,读操作是 slave 执行的。

